Rendering soft shadows
This is an online bonus chapter for The Ray Tracer Challenge, by Jamis Buck. To be successful, you:
should have an account at the Ray Tracer Challenge forum. Ask all your questions there, and see how others have managed!
must have a copy of The Ray Tracer Challenge.
must have implemented your ray tracer through chapter 8 (Shadows).
If you don't have a copy of the book, grab one today and start writing a 3D renderer of your own!
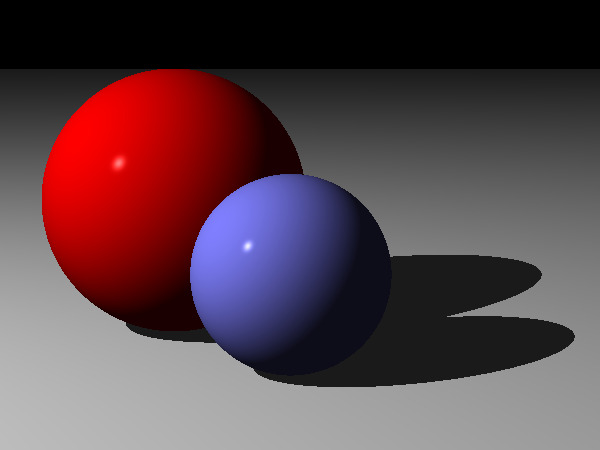
The point lights you implemented in chapter 6, "Light and Shading", of The Ray Tracer Challenge are wonderfully simple things, but they are also unlike any actual light source in the real world. For one thing, being without any physical dimension, they cast surreally sharp shadows, with crisp, well-defined edges, like in the following image.
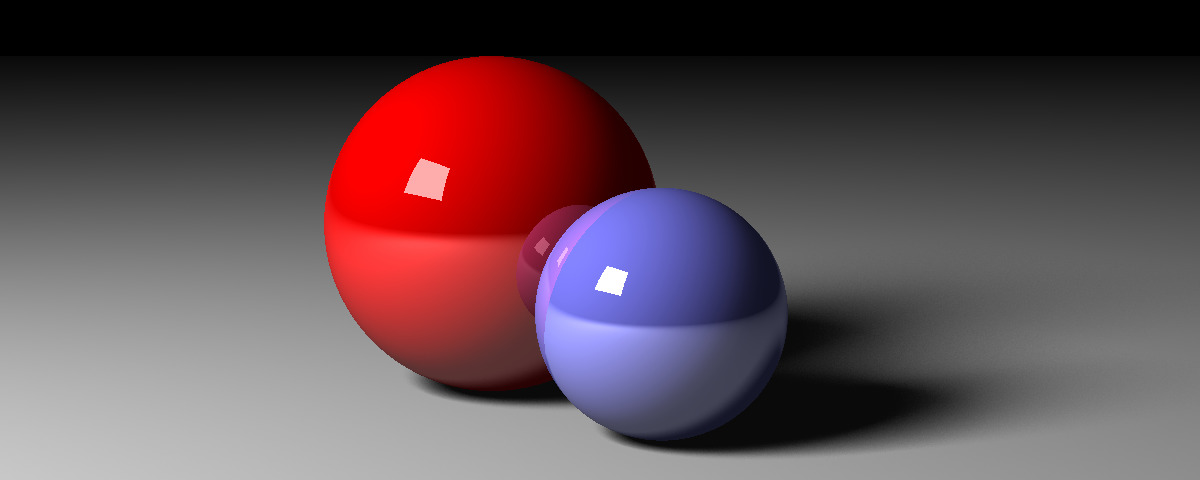
Real light sources—light bulbs, computer screens, windows, even the Sun—have physical dimension, which means that they may be only partially visible from any given point. This partial occlusion creates a penumbra—an area where the surface is lit by only a part of the light—resulting in a "fuzzy" shadow like in the following image.
In this bonus chapter, you'll implement a rectangular area light by following these steps:
- Add a new function for determining how much light from a light source reaches a given point. We'll call this the intensity of the light at that point.
- Update the
lighting()function to use thisintensityvalue, instead of the simple boolean you used in chapter 8. - Implement a rectangular area light.
- Experiment with randomly sampling the area light.
- Update the
lighting()function so that it samples the area light when determining the diffuse and specular components for shading.
This is not going to be a sophisticated area light, but it will be enough to introduce you to some of the principles behind sampling a light source. By the end, and with a bit of patience, you'll be rendering soft shadows like a boss! And since the journey is never truly done, I'll also provide a few additional resources for you to study if you want to take your area lights further. It's really up to you.
Let's get this party started.
Finding the intensity of a point light
In chapter 8, "Shadows", you implemented a function called is_shadowed(world, point), which returned true if the given point was in shadow, and false otherwise. The first thing you're going to do is rework that function so that it can be used with other kinds of lights to determine occlusion and visibility.
To that end, write the following test which shows the new interface for is_shadowed(world, light_position, point).
world.featureScenario Outline: is_shadow tests for occlusion between two points
  Given w ← default_world()
    And light_position ← point(-10, -10, -10)
    And point ← <point>
  Then is_shadowed(w, light_position, point) is <result>

  Examples:
    | point                | result |
    | point(-10, -10, 10)  | false  |
    | point(10, 10, 10)    | true   |
    | point(-20, -20, -20) | false  |
    | point(-5, -5, -5)    | false  |
The updated function should not explicitly rely on any light source in the world itself. Instead, it will cast a ray from point to light_position and look to see if any objects intersect the ray between those two points.
Changing this interface is going to break some of your other tests. You can remove the other is_shadowed tests (the new test covers the same conditions). You'll also need to fix your shade_hit function so that it passes the position of your light source to is_shadowed.
Once your tests are passing again, you'll be ready to implement a new function: intensity_at(light, point, world). The following test shows how it ought to behave for a point light.
lights.featureScenario Outline: Point lights evaluate the light intensity at a given point
  Given w ← default_world()
    And light ← w.light
    And pt ← <point>
  When intensity ← intensity_at(light, pt, w)
  Then intensity = <result>

  Examples:
    | point                | result |
    | point(0, 1.0001, 0)  | 1.0    |
    | point(-1.0001, 0, 0) | 1.0    |
    | point(0, 0, -1.0001) | 1.0    |
    | point(0, 0, 1.0001)  | 0.0    |
    | point(1.0001, 0, 0)  | 0.0    |
    | point(0, -1.0001, 0) | 0.0    |
    | point(0, 0, 0)       | 0.0    |
For point lights, you'll implement this by calling your newly modified is_shadowed function, passing it the light's position. If the point is in shadow relative to the light's position, then intensity_at should return 0.0. Otherwise, it should return 1.0.
Make that much pass. Next up you'll hook this new intensity_at function into your shading routines.
Update the lighting and shading
The next step is to take your intensity_at function and plug it into the rest of your ray tracer. You'll do this by updating your lighting() function so it can handle a fractional intensity instead of a boolean "is shadowed" value.
Here's the test:
materials.featureScenario Outline: lighting() uses light intensity to attenuate color
  Given w ← default_world()
    And w.light ← point_light(point(0, 0, -10), color(1, 1, 1))
    And shape ← the first object in w
    And shape.material.ambient ← 0.1
    And shape.material.diffuse ← 0.9
    And shape.material.specular ← 0
    And shape.material.color ← color(1, 1, 1)
    And pt ← point(0, 0, -1)
    And eyev ← vector(0, 0, -1)
    And normalv ← vector(0, 0, -1)
  When result ← lighting(shape.material, w.light, pt, eyev, normalv, <intensity>)
  Then result = <result>

  Examples:
    | intensity | result                  |
    | 1.0       | color(1, 1, 1)          |
    | 0.5       | color(0.55, 0.55, 0.55) |
    | 0.0       | color(0.1, 0.1, 0.1)    |
The last parameter of the lighting() function has been changed from a boolean to a floating point number, representing how much light is present. If that value is 1.0, it behaves the same as before when the "shadowed" parameter was false. If it's 0.0, then it's as if "shadowed" was true. The difference is, now you need to update lighting() to handle everything in between.
To make the test pass, your lighting() function needs to multiply the diffuse and specular components by this light_intensity value. Be sure and leave the ambient component alone, though; the ambient value is never affected by the amount of shadow.
Also, be sure and update your shade_hit() function so that it invokes intensity_at() and passes the result to the lighting() function.
Once you've done all that, your tests should all be passing, and your code is now ready for you to begin implementing area lights. Yeah!
Area lights
In the real world, light sources take an enormous variety of different forms. From light bulbs, to phone screens, to windows, to candle flames, to the Sun itself—any surface you can imagine could conceivably be made to emit light.
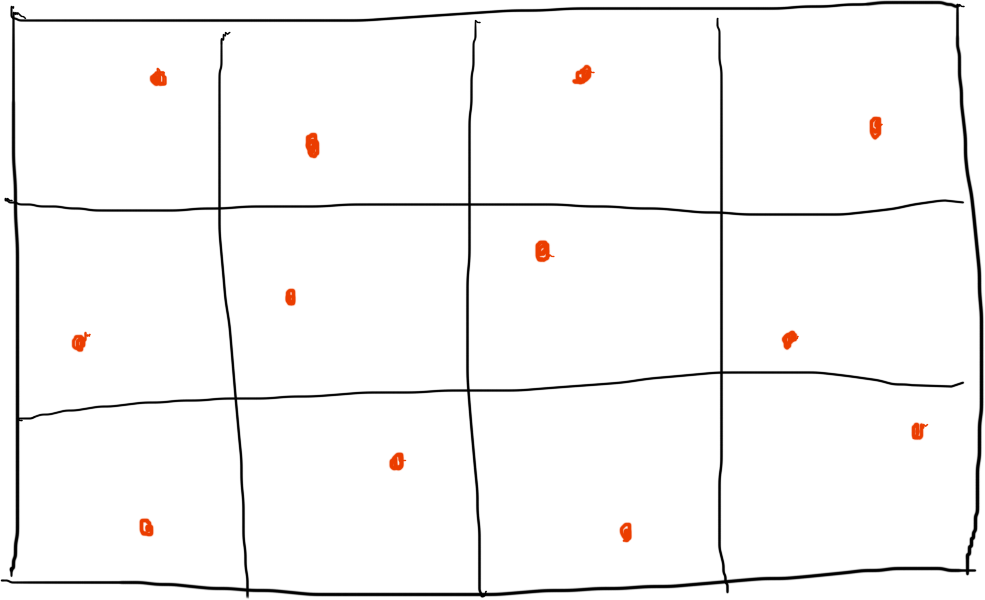
That's overwhelming to contemplate from an implementation perspective, though. For this chapter, we're going to strip all the bells and whistles and implement a perfectly flat, rectangular light source. The following diagram shows how it'll be described.
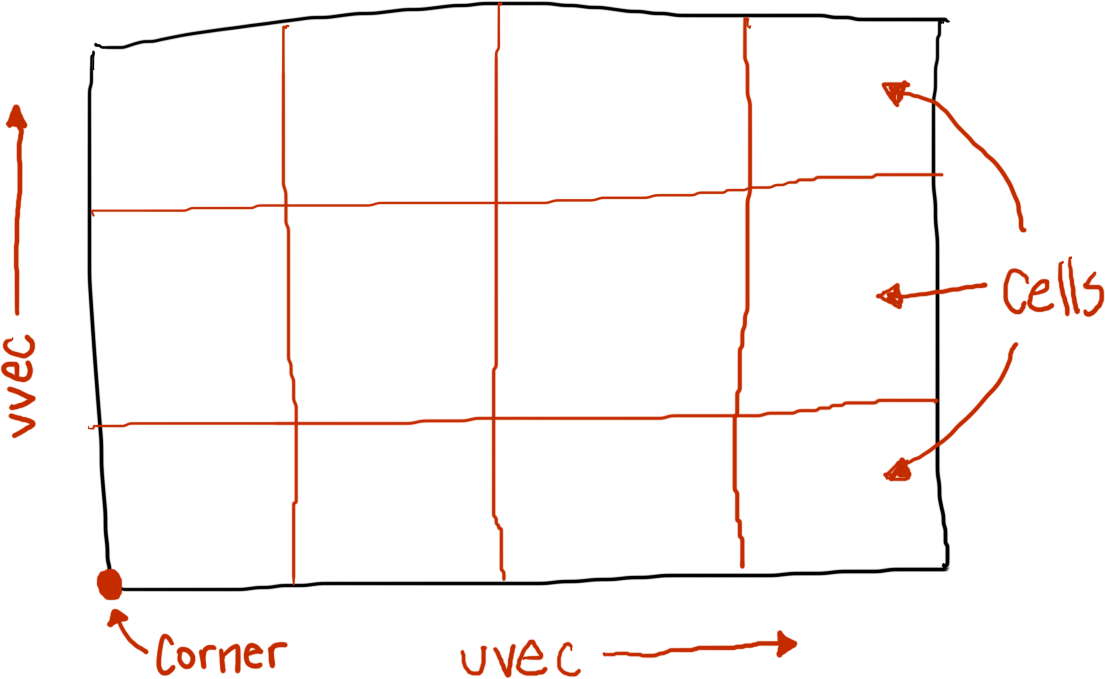
cornerdescribes the position of one corner of the light source. In the diagram, it's the lower left corner, but it can be any corner you like.uvecis the vector for theuedge, telling both the direction and length of the edge. The diagram does not explicitly give the value foruvec, so let's just say it'svector(4, 0, 0), making the light4units wide in thexdirection.- The
uedge is divided intoustepssections, telling how many points should be sampled along theuedge. Here, the light has austepsof4, which means the width of the light's cells can be found viauvec / usteps, orvector(1, 0, 0). vvecis a vector describing the direction and magnitude of thevedge. Again, the diagram does not specifyvvec, so let's just say it isvector(0, 3, 0), or3units in theydirection.- The
vedge is divided intovstepssections, telling how many points should be sampled along thevedge. Thevstepsfor this light is3. The height of each of the light's cells is found viavvec / vsteps, giving a sizevector(0, 1, 0). - The number of cells in the area light is the product of
ustepsandvsteps, or12in this case.
Finally, as with the point light, the area light will have an associated intensity, a color value indicating the color and strength of the light source.
The following test introduces a new function with each of these values, area_light(corner, full_uvec, usteps, full_vvec, vsteps, intensity), which builds and returns the corresponding area light.
lights.featureScenario: Creating an area light
  Given corner ← point(0, 0, 0)
    And v1 ← vector(2, 0, 0)
    And v2 ← vector(0, 0, 1)
  When light ← area_light(corner, v1, 4, v2, 2, color(1, 1, 1))
  Then light.corner = corner
    And light.uvec = vector(0.5, 0, 0)
    And light.usteps = 4
    And light.vvec = vector(0, 0, 0.5)
    And light.vsteps = 2
    And light.samples = 8
    And light.position = point(1, 0, 0.5)
The resulting light source encapsulates the usteps and vsteps arguments, but the full_uvec and full_vvec vectors have been divided by (respectively) usteps and vsteps, so that uvec and vvec represent the dimensions of a single cell of the grid. Also, samples is usteps times vsteps, telling how many cells (samples) will comprise the area light, and position is a point identifying the very center of the area light. (The position attribute is a temporary workaround, so we don't have to reimplement the lighting() function just yet.)
So, yeah, that's all good, but how does this actually translate into a functioning light source? For that, you'll need to implement the intensity_at function for the area light next. Mathematically speaking, your area light's intensity_at function needs to integrate the amount of light arriving at the point from over the entire surface of the area light, which (when framed like that) is non-trivial and more than a little daunting! Fortunately, there are some shortcuts you can take which involve finding intelligent ways to strategically sample the light source, and then averaging those samples together.
You'll do this in a couple of steps.
First, you need to be able to query the point that will be used to sample each cell on the area light. The cells are identified by (u, v) coordinates, with (0, 0) being the cell nearest the corner. Here's a test introducing a new function, point_on_light(light, u, v), which returns the point in the middle of the cell at the given coordinates.
lights.featureScenario Outline: Finding a single point on an area light
  Given corner ← point(0, 0, 0)
    And v1 ← vector(2, 0, 0)
    And v2 ← vector(0, 0, 1)
    And light ← area_light(corner, v1, 4, v2, 2, color(1, 1, 1))
  When pt ← point_on_light(light, <u>, <v>)
  Then pt = <result>

  Examples:
    | u | v | result               |
    | 0 | 0 | point(0.25, 0, 0.25) |
    | 1 | 0 | point(0.75, 0, 0.25) |
    | 0 | 1 | point(0.25, 0, 0.75) |
    | 2 | 0 | point(1.25, 0, 0.25) |
    | 3 | 1 | point(1.75, 0, 0.75) |
Here's where those modified uvec and vvec vectors come in handy, since you can multiply them by the u and v arguments to get the top-left corner of the cell in question. To get to the middle of the cell, you'll add 0.5 to both u and v before multiplying. In pseudocode:
function point_on_light(light, u, v)
  return light.corner +
         light.uvec * (u + 0.5) +
         light.vvec * (v + 0.5)
end function
Now, you can finally get down to the happy business of writing your area light's intensity_at() function. Here's a test to set the stage:
lights.featureScenario Outline: The area light intensity function
  Given w ← default_world()
    And corner ← point(-0.5, -0.5, -5)
    And v1 ← vector(1, 0, 0)
    And v2 ← vector(0, 1, 0)
    And light ← area_light(corner, v1, 2, v2, 2, color(1, 1, 1))
    And pt ← <point>
  When intensity ← intensity_at(light, pt, w)
  Then intensity = <result>

  Examples:
    | point                | result |
    | point(0, 0, 2)       | 0.0    |
    | point(1, -1, 2)      | 0.25   |
    | point(1.5, 0, 2)     | 0.5    |
    | point(1.25, 1.25, 3) | 0.75   |
    | point(0, 0, -2)      | 1.0    |
To make this test pass, you need to iterate over every cell in your area light, fetching the corresponding point with point_on_light(), and then calling is_shadowed() with that point. Every point in shadow is worth 0.0, and every point not in shadow is worth 1.0. Find the average over all the points you've sampled, and voilà! You've got your intensity.
In pseudocode it comes together something like this:
function intensity_at(light, point, world)
  total ← 0.0

  for v ← 0 to light.vsteps - 1
    for u ← 0 to light.usteps - 1
      light_position ← point_on_light(light, u, v)
      if not is_shadowed(world, light_position, point)
        total ← total + 1.0
      end if
    end for
  end for

  return total / light.samples
end
With those tests passing so far, you can add an area light to a scene and render it. You should notice two things pretty quickly:
- With smaller values for
ustepsandvsteps, the shadows strongly exhibit banding—distinct step-like differences in shadow intensity. - With larger values for
ustepsandvsteps, your renders take longer and longer to complete.
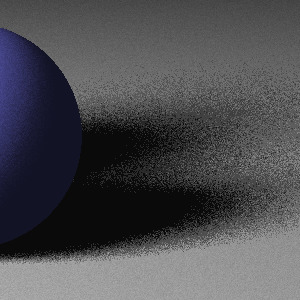
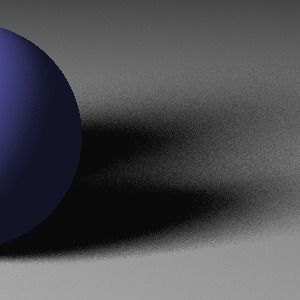
Here are a few images I rendered with the Ruby implementation of my ray tracer, comparing quality of the shadows produced with the amount of time taken to render each image. Each image was rendered at 300x300 pixels.


With a point light the image would take just a few seconds to render, but with the area light it takes almost two minutes, and still produces an image that exhibits banding. Ugh!
These bands occur when a cell on the light source becomes occluded, much like the shadows from point light sources. How to work around this? Let's talk about one possible way, next.
Randomly sampling your area lights
One of the weaknesses of the strategy presented previously, with a regular sampling of points on the light source, is that it fails to acknowledge that light is actually being emitted by the entire surface. This comes back to the idea of integrating across the whole light, which isn't really a feasible thing to do.
Let's simplify the problem, then. What if, instead of trying to sample every point, we sample a random subset of points? The following diagram shows an area light divided into cells, with sample points chosen randomly from within each cell.
We say that these sample points have been jittered, or moved randomly away from their default position at the middle of each cell.
That's what you'll do next, but one of the challenges of writing unit tests for a random process is that they are inherently (and intentionally) non-deterministic. To be able to test them, we need to add some determinism to the process.
To allow you to test a random process, you need to be able to inject a fake random number generator into the process, which will return a deterministic sequence of numbers.
Here's a test for just such a sequence.
sequences.featureScenario: A number generator returns a cyclic sequence of numbers
  Given gen ← sequence(0.1, 0.5, 1.0)
  Then next(gen) = 0.1
    And next(gen) = 0.5
    And next(gen) = 1.0
    And next(gen) = 0.1
Every time you call next() on the sequence, it returns the next element of the sequence. When you reach the end, it starts over.
Once your sequence works, you can update your area light so that it accepts a sequence to use for jittering the points that the point_on_light() function returns. Every element of the sequence must be a number between 0 and 1, inclusive. In practice, when actually rendering a scene, you'll replace this deterministic sequence with a sequence that actually returns random (or pseudo-random) numbers between 0 and 1.
Here's a test showing the expected effect of using the sequence to jitter the points.
lights.featureScenario Outline: Finding a single point on a jittered area light
  Given corner ← point(0, 0, 0)
    And v1 ← vector(2, 0, 0)
    And v2 ← vector(0, 0, 1)
    And light ← area_light(corner, v1, 4, v2, 2, color(1, 1, 1))
    And light.jitter_by ← sequence(0.3, 0.7)
  When pt ← point_on_light(light, <u>, <v>)
  Then pt = <result>

  Examples:
    | u | v | result               |
    | 0 | 0 | point(0.15, 0, 0.35) |
    | 1 | 0 | point(0.65, 0, 0.35) |
    | 0 | 1 | point(0.15, 0, 0.85) |
    | 2 | 0 | point(1.15, 0, 0.35) |
    | 3 | 1 | point(1.65, 0, 0.85) |
To make this work, you'll need to change your point_on_light() function to use the new light.jitter_by attribute to return an offset value, instead of hard-coding 0.5. In pseudocode:
function point_on_light(light, u, v)
  return light.corner +
         light.uvec * (u + next(light.jitter_by)) +
         light.vvec * (v + next(light.jitter_by))
end function
(Note that the test assumes you're implementing point_on_light in just this way; if you're jittering v before u, for example, the sequence won't be applied in the same order, and your test results won't match these!)
Once that test passes, you can step back and make sure the intensity_at() function works with the jitter-enabled point_on_light() function. It should, since nothing else changed! Here's a test to make sure this is so.
lights.featureScenario Outline: The area light with jittered samples
  Given w ← default_world()
    And corner ← point(-0.5, -0.5, -5)
    And v1 ← vector(1, 0, 0)
    And v2 ← vector(0, 1, 0)
    And light ← area_light(corner, v1, 2, v2, 2, color(1, 1, 1))
    And light.jitter_by ← sequence(0.7, 0.3, 0.9, 0.1, 0.5)
    And pt ← <point>
  When intensity ← intensity_at(light, pt, w)
  Then intensity = <result>

  Examples:
    | point                | result |
    | point(0, 0, 2)       | 0.0    |
    | point(1, -1, 2)      | 0.5    |
    | point(1.5, 0, 2)     | 0.75   |
    | point(1.25, 1.25, 3) | 0.75   |
    | point(0, 0, -2)      | 1.0    |
Wonderful! Once that test passes, you can render your area light scene again! You'll find that there is both good news and bad news, though.
The good news: the banding should be completely gone. Randomly jittering the sample points on the area light definitely fixes that.
The bad news: your shadows are now quite noisy, especially at low sample counts. Consider the following sequence of images, which shows the same scene as before with increasingly large numbers of samples. (Note that runtimes were approximately the same as with the unjittered sample points.)

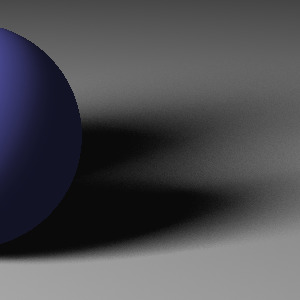
So, yay! No banding! But, though the results are generally better than those that used a regular (non-random) sampling, the shadows do tend to be noisy. There's really no silver bullet in this case. It's all about trade-offs. You can use a smaller area light and get away with fewer samples and grainier shadows, or a larger area light with commensurately more samples and smoother shadows. Or you can find some heuristic to adapt the number of samples depending on how far away the light is from the point being shadow-tested, or maybe on how large the light source is relative to the point. In the end, though, there's no getting around the fact that area lights simply require your ray tracer to work harder.
That said, there are techniques you can use to further optimize how you sample your area lights. One such is adaptive subdivision, where you use some heuristics to determine which portions of your area light to sample at a finer resolution. You can read one (fairly sophisticated) approach in this article from EUROGRAPHICS '92: Adaptive Sampling of Area Light Sources in Ray Tracing Including Diffuse Interreflection. A more analytical approach is found in Soft Shadow Volumes for Ray Tracing with Frustum Shooting. You can find a wealth of additional ideas by looking at the bibliographies for articles like these, as well.
Feel free to go explore those articles, but there's one last thing to look at before you're done here: making your Phong shading area-light-aware.
Area lights and Phong shading
Shadows are not the only part of your ray tracer that involve sampling the light source. If you recall "The Phong Reflection Model" in chapter 6 ("Light and Shading") of The Ray Tracer Challenge, it involved querying the position of the light source in order to build the light vector, which was used to find both the diffuse and specular contributions to your surface shading.
Well, your area lights won't be done until you update these routines to sample your area light as well. That way, the diffuse and specular shading will more accurately depict the effect of the area light.
Take a moment and reacquaint yourself with your lighting() function. The code to compute the ambient component won't change at all, since it is not dependent on the position of the light source. However, for the diffuse and specular components, you're going to want to once again sample different positions on your area light, compute the diffuse and specular contributions at each point, and then average the results together before adding them to the ambient value. This test shows how your function ought to behave with an area light.
materials.featureScenario Outline: lighting() samples the area light
  Given corner ← point(-0.5, -0.5, -5)
    And v1 ← vector(1, 0, 0)
    And v2 ← vector(0, 1, 0)
    And light ← area_light(corner, v1, 2, v2, 2, color(1, 1, 1))
    And shape ← sphere()
    And shape.material.ambient ← 0.1
    And shape.material.diffuse ← 0.9
    And shape.material.specular ← 0
    And shape.material.color ← color(1, 1, 1)
    And eye ← point(0, 0, -5)
    And pt ← <point>
    And eyev ← normalize(eye - pt)
    And normalv ← vector(pt.x, pt.y, pt.z)
  When result ← lighting(shape.material, shape, light, pt, eyev, normalv, 1.0)
  Then result = <result>

  Examples:
    | point                      | result                        |
    | point(0, 0, -1)            | color(0.9965, 0.9965, 0.9965) |
    | point(0, 0.7071, -0.7071)  | color(0.6232, 0.6232, 0.6232) |
Note how the expected color in the first example is just a bit darker than pure white. If this had been a point light, it would have been pure white. Here, though, because the area light's intensity is the sum of all the illumination across its entire surface, the intensity at that point is diminished by the contributions from the light that aren't directly opposite the point.
To make that test pass, you'll modify your lighting() function so it iterates over the samples from the area light. Here's some pseudocode:
function lighting(material, object, light, point, eyev, normalv, intensity)
  color ← get base color from material.color or material.pattern
  ambient ← compute ambient contribution

  sum ← black
  for each sample on the light
    sum ← sum + diffuse contribution from sample
    sum ← sum + specular contribution from sample
  end for

  return ambient + (sum / number of samples) * intensity
end function
Also, to make this work without different cases for point lights and area lights, you might consider treating a point light as an area light with only a single sample.
Note that your new lighting() function no longer depends on light.position. You can remove that attribute if you want (and update any tests that reference it).
Wrapping it up
That's really about it! Now, it's time to just play around with your area lights and see what you discover about them. How well do the shadows render when the area light is large? What about shadows cast by shapes that are small relative to the light source?
Take some time to read the articles mentioned at the end of the "Randomly sampling your area lights" section. Even if you don't try to implement them, it's worth knowing how this problem has been solved by others. Who knows? You might even be inspired to find an entirely new approach and revolutionize computer graphics forever!
So. Experiment. Play. Try, and then try again. Soft shadows are now your oyster. What will you do with them?
Happy rendering!
Did you like what you read here? The book follows the same format! With extensive tests and pseudocode, it will walk you through writing a ray tracer of your very own, from scratch. Grab your copy today!
If you've already purchased my book: thank you, thank you, thank you! I hope you find the same satisfaction I've found in writing your own 3D renderer.
Reviews really do drive sales, though, so it would mean a lot to me if you could leave a review of the book somewhere: Amazon.com, Goodreads.com, Twitter, Facebook, your own personal website, or any other place where folks might come across your review.
Thanks!
shadow-glamour-shot.yml# =========================================================
# shadow-glamour-shot.yml
#
# Produces the banner image from the "Rendering soft
# shadows" bonus chapter for "The Ray Tracer Challenge",
# by Jamis Buck.
#
# <jamis@jamisbuck.org>
# =========================================================

- add: camera
  width: 400
  height: 160
  field-of-view: 0.7854
  from: [-3, 1, 2.5]
  to: [0, 0.5, 0]
  up: [0, 1, 0]

- add: light
  corner: [-1, 2, 4]
  uvec: [2, 0, 0]
  vvec: [0, 2, 0]
  usteps: 10
  vsteps: 10
  jitter: true
  intensity: [1.5, 1.5, 1.5]

# Put the light in the middle of a "shining" cube so that it can show
# up in reflections as a physical thing. Naturally, the cube must
# opt out of shadow tests...
- add: cube
  material:
    color: [1.5, 1.5, 1.5]
    ambient: 1
    diffuse: 0
    specular: 0
  transform:
    - [ scale, 1, 1, 0.01 ]
    - [ translate, 0, 3, 4 ]
  shadow: false

- add: plane
  material:
    color: [1, 1, 1]
    ambient: 0.025
    diffuse: 0.67
    specular: 0

- add: sphere
  transform:
    - [ scale, 0.5, 0.5, 0.5 ]
    - [ translate, 0.5, 0.5, 0 ]
  material:
    color: [1, 0, 0]
    ambient: 0.1
    specular: 0
    diffuse: 0.6
    reflective: 0.3

- add: sphere
  transform:
    - [ scale, 0.33, 0.33, 0.33 ]
    - [ translate, -0.25, 0.33, 0 ]
  material:
    color: [0.5, 0.5, 1]
    ambient: 0.1
    specular: 0
    diffuse: 0.6
    reflective: 0.3